
Paramètre du BIOS
REMARQUE : les écrans du BIOS inclus dans cette section ne sont
données qu'à titre indicatif et peuvent différer en fonction des
territoires et du modèles d'ordinateur portable.
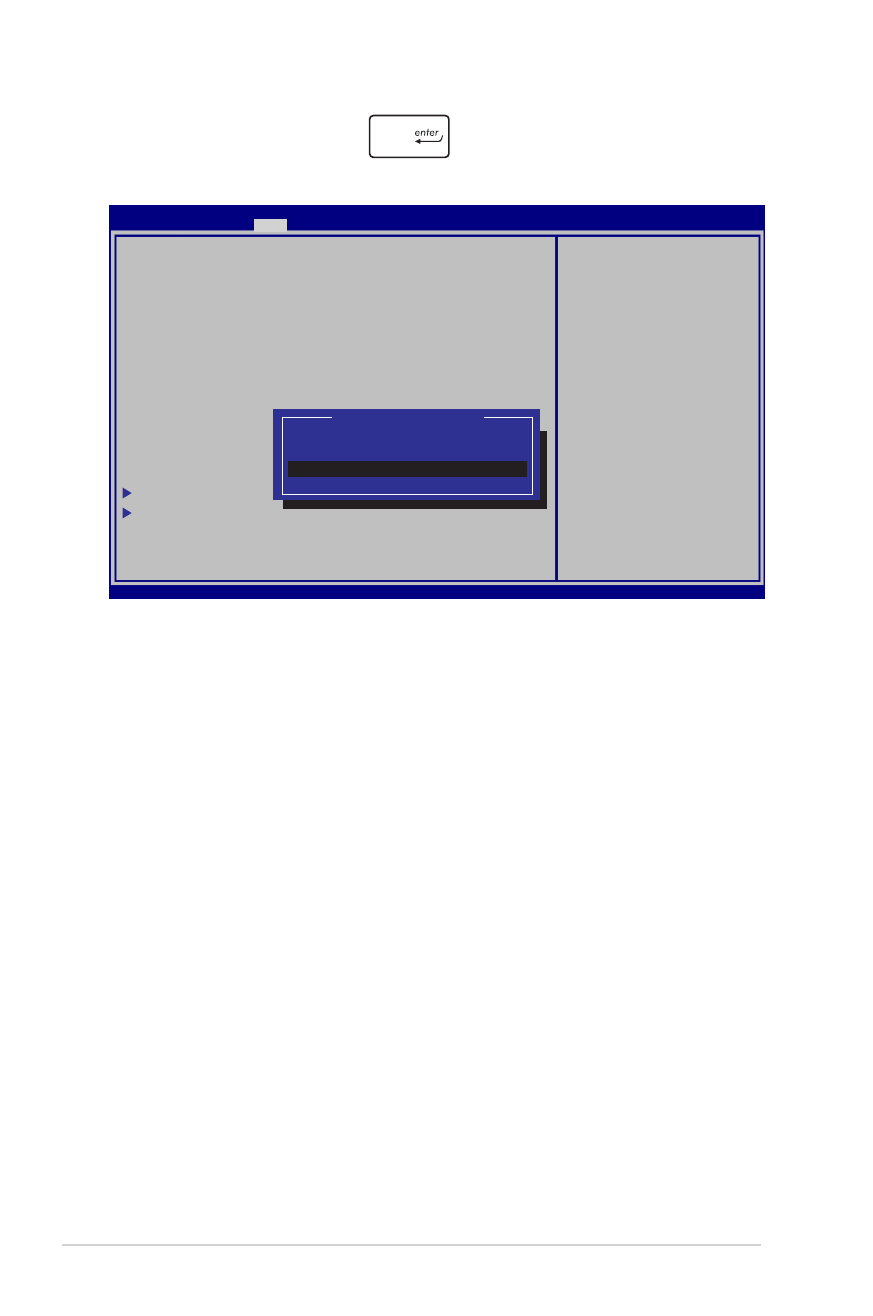
Menu Boot (Démarrage)
Ce menu vous permet de régler les options de démarrage de
l’ordinateur.
1. À partir du menu Boot (Démarrage), sélectionnez Boot Option
#1 (Option de démarrage #1).
Boot Configuration
Launch CSM [Enabled]
Launch PXE OpROM [Disabled]
Driver Option Priorities
Boot Option Priorities
Boot Option #1 [Windows Boot Manager]
Boot Option #2 [P1: Hitachi HTS547..]
Boot Option #3 [Atheros Boot Agent]
CD/DVD ROM Drive BBS Priorities
Network Device BBS Priorities
Add New Boot Option
Delete Boot Option
Aptio Setup Utility - Copyright (C) 2012 American Megatrends, Inc.
Main Advance
Boot
Security Save & Exit
Version 2.15.1231. Copyright (C) 2012 American Megatrends, Inc.
→←
: Select Screen
↑↓
: Select Item
Enter: Select
+/— : Change Opt.
F1 : General Help
F9 : Optimized Defaults
F10 : Save & Exit
ESC : Exit
Sets the system boot
order
76
Manuel électronique pour ordinateur portable
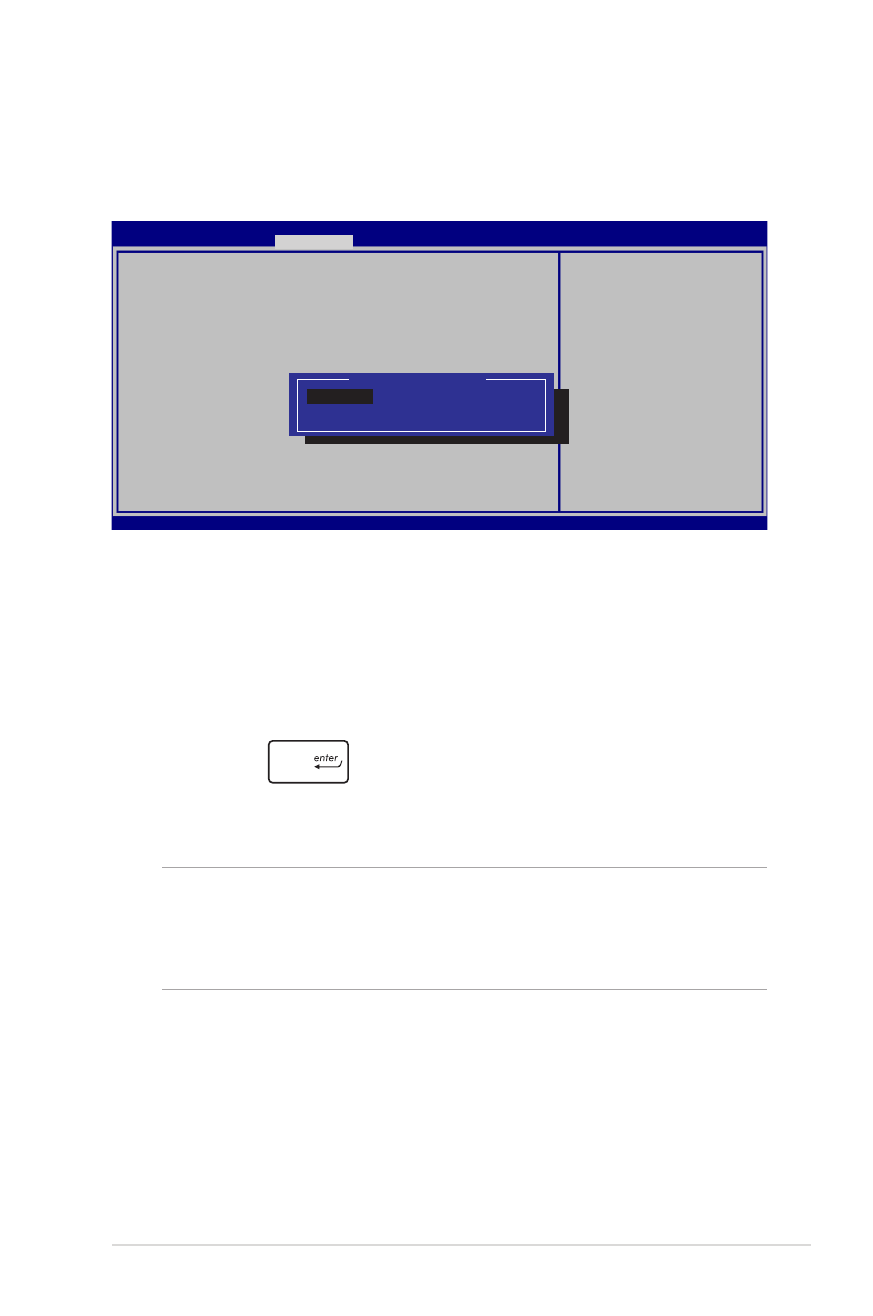
2. Appuyez sur la touche
du clavier et sélectionnez le
périphérique de démarrage primaire.
Boot Configuration
Launch CSM [Enabled]
Launch PXE OpROM [Disabled]
Driver Option Priorities
Boot Option Priorities
Boot Option #1 [Windows Boot Manager]
Boot Option #2 [P1: Hitachi HTS547..]
Boot Option #3 [Atheros Boot Agent]
CD/DVD ROM Drive BBS
Network Device BBS Priorities
Add New Boot Option
Delete Boot Option
Aptio Setup Utility - Copyright (C) 2012 American Megatrends, Inc.
Main Advance
Boot
Security Save & Exit
Version 2.15.1231. Copyright (C) 2012 American Megatrends, Inc.
→←
: Select Screen
↑↓
: Select Item
Enter: Select
+/— : Change Opt.
F1 : General Help
F9 : Optimized Defaults
F10 : Save & Exit
ESC : Exit
Sets the system boot
order
Boot Option #1
Atheros Boot Agent
P1: Hitachi HTS547575A9E384
Windows Boot Manager
Disabled

Manuel électronique pour ordinateur portable
77
Sécurité
Cette page permet de définir les mots de passe administrateur et
utilisateur de votre ordinateur portable. Il permet également de
contrôler l’accès au disque dur, aux interfaces de connexion d’E/S
(entrée/sortie) et USB de l’ordinateur portable.
Pour définir un mot de passe :
1. À partir de l’écran Security (Sécurité), sélectionnez
Administrator Password (Mot de passe Administrateur) ou
User Password (Mot de passe utilisateur).
2. Saisissez un mot de passe, puis appuyez sur
.
3. Entrez à nouveau le mot de passe et appuyez sur
.
REMARQUE :
• Si vous définissez un mot de passe utilisateur, il vous sera
demandé d’entrer ce mot de passe avant chaque ouverture de
session du système d’exploitation.
• Si vous définissez un mot de passe administrateur, il vous sera
demandé d’entrer ce mot de passe avant chaque tentative d’accès
à l’interface de configuration du BIOS.
Password Description
If ONLY the Administrator’s password is set,then this
only limits access to Setup and is only asked for when
entering Setup. If ONLY the user’s password is set,
then this is a power on password and must be entered
to boot or enter Setup. In Setup, the User will have
Administrator rights.
Administrator Password Status
NOT INSTALLED
User Password Status
NOT INSTALLED
Administrator Password
User Password
HDD User Password Status :
NOT INSTALLED
Set Master Password
Set User Password
I/O Interface Security
Secure Boot Control [Enabled]
Set Administrator
Password. The password
length must be in the
following range:
Minimum length 3
Maximum length 20
Must type with
character:
a-z, 0-9
Aptio Setup Utility - Copyright (C) 2012 American Megatrends, Inc.
Main Advance Boot
Security
Save & Exit
→←
: Select Screen
↑↓
: Select Item
Enter: Select
+/— : Change Opt.
F1 : General Help
F9 : Optimized Defaults
F10 : Save & Exit
ESC : Exit
Version 2.15.1231. Copyright (C) 2012 American Megatrends, Inc.

78
Manuel électronique pour ordinateur portable
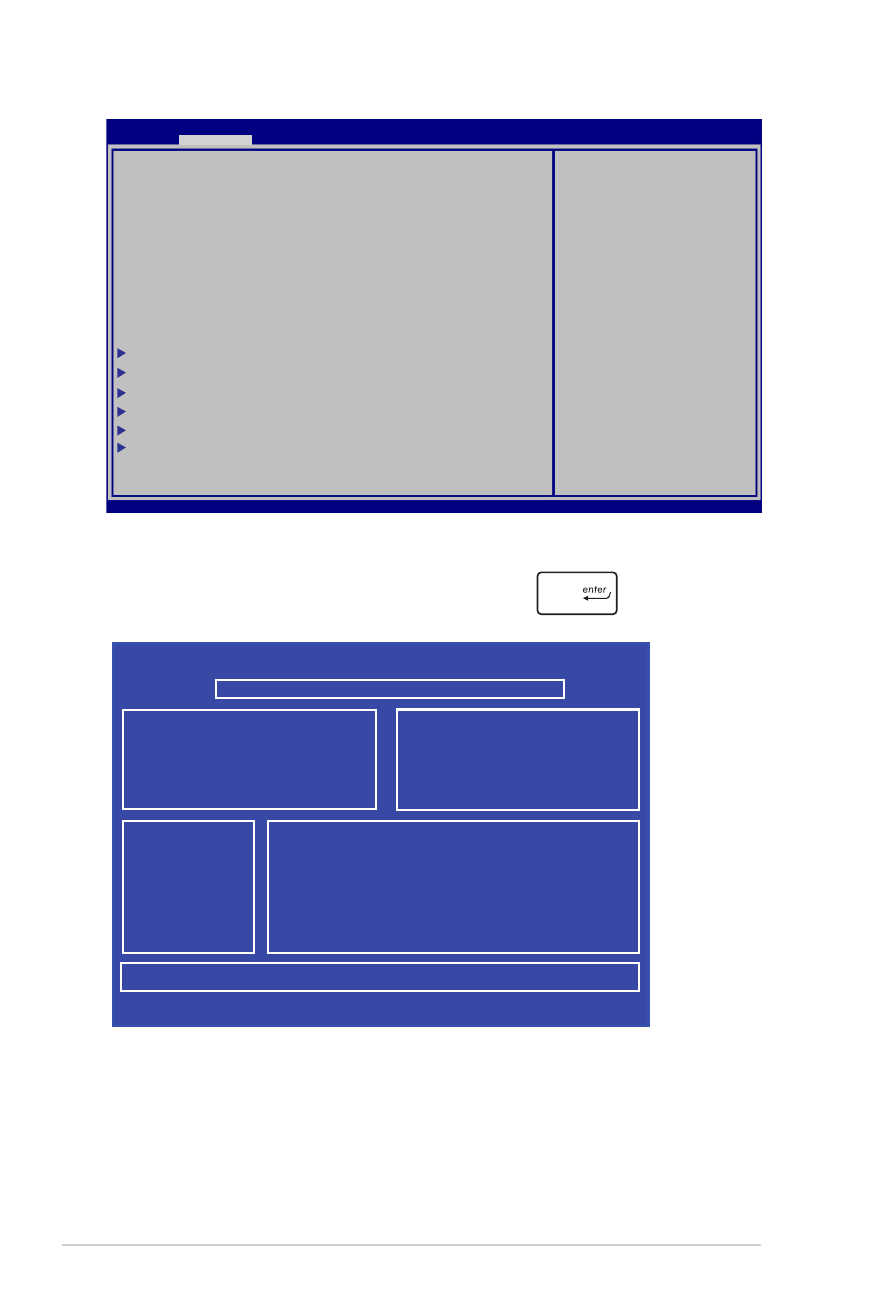
I/O Interface Security (Sécurité des interfaces d’E/S)
Cette page permet de verrouiller ou de déverrouiller certaines
fonctionnalités des interfaces d’E/S (entrée/sortie) de votre
ordinateur portable.
Pour verrouiller une interface d’e connexion :
1. À partir de l’écran Security (Sécurité), sélectionnez I/O
Interface Security (Sécurité des interfaces d’E/S).
2. Choisissez l’interface à verrouiller, puis appuyez sur la
touche
du clavier.
3. Sélectionnez Lock (Verrouiller).
Pour effacer le mot de passe :
1. À partir de l’écran Security (Sécurité), sélectionnez
Administrator Password (Mot de passe Administrateur) ou
User Password (Mot de passe utilisateur).
2. Saisissez le mot de passe actuel, puis appuyez sur
.
3. Laissez le champ Create New Password (Créer un nouveau mot
de passe) vide puis appuyez sur
.
4. Sélectionnez Yes (Oui) à l’apparition de la boîte de dialogue,
puis appuyez sur
du clavier.
I/O Interface Security
LAN Network Interface
[UnLock]
Wireless Network Interface
[UnLock]
HD AUDIO Interface
[UnLock]
SATA 2nd HDD Interface
[UnLock]
SATA ODD Interface
USB Interface Security
If Locked, LAN controller
will be disabled.
LAN Network Interface
Lock
UnLock
Aptio Setup Utility - Copyright (C) 2012 American Megatrends, Inc.
Security
→←
: Select Screen
↑↓
: Select Item
Enter: Select
+/— : Change Opt.
F1 : General Help
F9 : Optimized Defaults
F10 : Save & Exit
ESC : Exit
Version 2.15.1231. Copyright (C) 2012 American Megatrends, Inc.
Manuel électronique pour ordinateur portable
79
USB Interface Security (Sécurité de l‘interface USB)
Cette page permet de verrouiller ou de déverrouiller certains
ports et dispositifs USB.
Pour verrouiller l’interface USB :
1. À partir de l’écran Security (Sécurité), sélectionnez
I/O Interface Security (Sécurité des interfaces d’E/S) > USB
Interface Security (Sécurité de l‘interface USB).
2. Choisissez l’une des options disponibles, puis appuyez sur la
touche
du clavier.
3. Sélectionnez Lock (Verrouiller).
REMARQUE : Si vous avez défini l'élément USB Interface sur [Lock],
l'élément External Ports (Ports externes) et tous les dispositifs faisant
parti de l'élément USB Interface Security (Sécurité de l‘interface
USB) seront simultanément verrouillés et masqués.
Version 2.15.1231. Copyright (C) 2012 American Megatrends, Inc.
USB Interface Security
USB Interface
[UnLock]
External Ports
[UnLock]
CMOS Camera
[UnLock]
Card Reader
[UNLOCKED]
If LOCKED, all USB
devices will
be disabled
USB Interface
Lock
UnLock
Aptio Setup Utility - Copyright (C) 2012 American Megatrends, Inc.
Security
→←
: Select Screen
↑↓
: Select Item
Enter: Select
+/— : Change Opt.
F1 : General Help
F9 : Optimized Defaults
F10 : Save & Exit
ESC : Exit
80
Manuel électronique pour ordinateur portable
Master Password (Mot de passe principal)
À partir de la page Security (Sécurité), vous pouvez utilisez
l’option Set Master Password (Définir le mot de passe principal)
pour définir un mot de passe d’accès au disque dur.
Pour définir un mot de passe d’accès au disque dur :
1. À partir de l’écran Security (Sécurité), sélectionnez Set
Master Password (Définir le mot de passe principal).
2. Saisissez un mot de passe, puis appuyez sur
.
3. Entrez à nouveau le mot de passe et appuyez sur
.
4. Cliquez sur Set User Password (Définir le mot de passe
utilisateur) et répétez les étapes précédentes pour définir un
mot de passe utilisateur.
Aptio Setup Utility - Copyright (C) 2011 American Megatrends, Inc.
Aptio Setup Utility - Copyright (C) 2012 American Megatrends, Inc.
Main Advance Boot
Security
Save & Exit
→←
: Select Screen
↑↓
: Select Item
Enter: Select
+/— : Change Opt.
F1 : General Help
F9 : Optimized Defaults
F10 : Save & Exit
ESC : Exit
Version 2.15.1231. Copyright (C) 2012 American Megatrends, Inc.
Password Description
If ONLY the Administrator’s password is set,then this only
limits access to Setup and is only asked for when entering
Setup. If ONLY the user’s password is set, then this is
a power on password and must be entered to boot or enter
Setup. In Setup, the User will have Administrator rights.
Administrator Password Status
NOT INSTALLED
User Password Status
NOT INSTALLED
Administrator Password
User Password
HDD User Pwd Status :
NOT INSTALLED
Set Master Password
Set User Password
I/O Interface Security
Secure Boot Control [Disabled]
Set HDD Master Password.
***Advisable to Power
Cycle System after
Setting Hard Disk
Passwords***

Manuel électronique pour ordinateur portable
81
Save & Exit (Sauvegarder et quitter)
Si vous souhaitez conserver les modifications effectuées dans le
BIOS, vous devez les enregistrer avant de quitter le BIOS par le biais
de l’option Save Changes and Exit (Enregistrer les modifications et
quitter).
Pour mettre à jour le BIOS :
1. Vérifiez le modèle exact de votre ordinateur portable, puis
téléchargez le dernier fichier BIOS disponible pour ce modèle
spécifique sur le site Web d’ASUS.
2. Enregistrez une copie du fichier BIOS téléchargé sur un
périphérique de stockage externe.
3. Connectez votre périphérique de stockage ç l’ordinateur
portable.
4. Redémarrez l’ordinateur portable, puis appuyez sur la ouche
du clavier lors de l’exécution du POST.
5. Dans le BIOS, cliquez sur Advanced (Avancé) > Start Easy Flash
(Démarrer Easy Flash), puis appuyez sur la touche
du
clavier.
Aptio Setup Utility - Copyright (C) 2012 American Megatrends, Inc.
Main Advance Boot Security
Save & Exit
→←
: Select Screen
↑↓
: Select Item
Enter: Select
+/— : Change Opt.
F1 : General Help
F9 : Optimized Defaults
F10 : Save & Exit
ESC : Exit
Version 2.15.1231. Copyright (C) 2012 American Megatrends, Inc.
Save Changes and Exit
Discard Changes and Exit
Save Options
Save Changes
Discard Changes
Restore Defaults
Boot Override
Atheros Boot Agent
P1: Hitachi HTS547575A9E384
Windows Boot Manager
Launch EFI Shell from filesystem device
Exit system setup after
saving the changes.
82
Manuel électronique pour ordinateur portable
6. Localisez le fichier BIOS téléchargé contenu sur le périphérique
de stockage, puis appuyez sur la touche
du clavier.
7. Une fois le processus de mise à jour terminé, sélectionnez Exit
(Quitter) > Restore Defaults (Restaurer les valeurs par défaut)
pour restaurer les paramètres par défaut du BIOS.
Aptio Setup Utility - Copyright (C) 2011 American Megatrends, Inc.
Start Easy Flash
Internal Pointing Device
[Enabled]
Wake on Lid Open
[Enabled]
Power Off Energy Saving
[Enabled]
ASUS USB Charger+ in battery mode [Disabled]
Intel Virtualization Technology [Enabled]
Intel AES-NI [Enabled]
CPU C states
[Disabled]
VT-d
[Enabled]
SATA Configuration
Graphics Configuration
Intel (R) Thunderbolt
USB Configuration
Intel (R) Anti-Theft Technology Corporation
Network Stack
Press Enter to run the
utility to select and
update BIOS.
Aptio Setup Utility - Copyright (C) 2012 American Megatrends, Inc.
Main
Advance
Boot Security Save & Exit
→←
: Select Screen
↑↓
: Select Item
Enter: Select
+/— : Change Opt.
F1 : General Help
F9 : Optimized Defaults
F10 : Save & Exit
ESC : Exit
Version 2.15.1231. Copyright (C) 2012 American Megatrends, Inc.
ASUSTek Easy Flash Utility
FSO
FS1
FS2
FS3
0 EFI
<DIR>
[←→]: Switch [↑↓]: Choose [q]: Exit [Enter]: Enter/Execute
Current BIOS
Platform: G750JX
Version: T30
Build Date: Dec 22 2012
Build Time: 12:43:56
New BIOS
Platform: Unknown
Version: Unknown
Build Date: Unknown
Build Time: Unknown
FLASH TYPE:
Winbond 25X/Q Series

Manuel électronique pour ordinateur portable
83